"It takes ages to finish a quilt you're not working on!"

Saturday, July 24, 2010

Craft & Quilt Show in Melbourne.

Sharon and I went to the Craft & Quilt show at Jeff's Shed on Friday. I took dozens of photos of the quilts on display which were as usual, absolutely sensational. I've posted the pics on my Quilt Show blog here. We both had a strict budget to stick to, but I also had a short list of items I would be looking for. I found them - ruler/template to make Dresden plate blades, and Sashiko threads. We did a couple of workshops too which were of great benefit. Sharon sat in an a quilter/author's workshop, and did the Tumbling Blocks workshop that I did at an earlier Craft fair.
I did one on using up scraps in patchwork, and the other on binding. Binding is one of my poor points when it comes to finishing off projects, and I tend to take the easy way out. Judy showed us various ways of finishing off things, and suggested a few other projects, one of which I actually applauded her on! A few people looked around at me as if to say "What??" Judy said she hated throwing out perfectly good cork placemats where the glossy front picture had faded or got marked with use. She showed us patchwork 'pockets' which she made to cover the cork mats. I love it!!!! I also hate throwing them out, so watch this space for my efforts in making a couple of patchwork pockets for my old placemats. But don't hold your breath...there are still a lot of UFOs I want to tackle before 2010 ends. Dresden Plate ruler templates. Three skeins of Sashiko thread, Sashiko needles, Indigo fabric printed with traditional pattern, and a Clover tracing pen. I was using a biro or sharp pencil, but they weren't very good, so I was pleased to find this.
Naturally, as we did the rounds of the stalls, we found just a few goodies that we couldn't live without. I didn't buy ANY cross stitch kits or charts, but I found some gorgeous fabrics and knick knacks. I looked at this several times during the day, and finally gave in to temptation about 20 minutes before the Show closed! I selected these Japanese fabrics to complete a wall panel I have yet to start. Last year, Sharon gave me a lovely piece of Japanese fabric with an owl on it, but I needed more fabrics to do the borders, and these will be perfect.
These tiny dolls were $2 each, or five for $6. Just couldn't resist them! Don't know what I'll do with them, but I'll think of something. Or someone reading this will suggest something; my cyberspace friends are so helpful!
This beautiful dragon fly is for a friend who loves dragon flies.
Kitty buttons for $4 could not be left behind!
All in all I spent just over $100 (not including parking, entry fee and coffee) which is about what I had anticipated. I could have bought heaps more, but I was very strict with myself and stuck to what I thought I could use in the near future, instead of just topping up the Stash!

Saturday, July 10, 2010

Fabric postcard from Brazil, and necktie scraps.

I had one more postcard due to me from Stitchin Fingers' textile postcard birthday swap, and it arrived yesterday, from Heloisa in Brazil. Isn't it pretty? So many different stitches, and several layers of fabric.
I spent Friday afternoon with my friend Helen. Since her stroke, she isn't able to get around as freely as she once did, so I make a point of visiting her once a week. I've been buying mens' ties from opshops with the intention of deconstructing them to use the fabric to make stuff, and I took a bag around to Helen's for us to play with. It was a lovely sunny day, so we sat out in the sun with cups of tea and biscuits, and set to on my ties. We pulled apart 16 of them, and when I got home, I washed the fabrics in woolwash, and hung them out on the line to dry. When they were still damp, I brought them in and ironed them. This is tricky; most ties are made of silk or polyester, difficult fabrics to work with. I cut the tail off each one, and put the rest away for the future. I'm thinking about joining these up scrappy fashion, and cutting the result into squares. Just for fun.

Crazy Patchwork dressing gown

LeeAnn works for an opshop in country Victoria, and she was telling me about a dressing gown that was brought in to the shop last week, as part of an estate from an old lady who is now in residential care. When she described it, I had a pretty good idea what it would be like, so I asked if she could hold it for me, and I would transfer payment into her account as soon as she let me know how much it would cost. She warned me it might be about $45, and I said "Oh that's fine!" On Tuesday, she called me to say the manager had put $95 on it, and I said "That is still okay by me!"
LeeAnn had Friday off work, so she drove down to Melbourne just to bring it over to me, and it was everything I thought it would be. She said her boss told her if they sent it to one of the Melbourne inner suburban Salvos opshops, they would probably price it at $200 - $300. I would still have paid that much (by extracting an extra payment from my super.income stream!). Would you pay hundreds of dollars for this? Me showing the front. Leeann showing the back. Close up.

Tuesday, July 06, 2010

Op shops, and gifts.

Friend LeeAnn came to visit on Saturday, and brought me a belated birthday parcel. Among other goodies, she had found this for me: an Irish linen 3 piece set of place mat and two napkins, beautifully embroidered. She also included a bundle of fabric squares which will be perfect for a patchwork project I have in mind.

I usually post my opshop finds on the Op Shop blog here, but these items related more to this blog: A stack of craft magazines ranging from 50c to $3 each, depending on where I bought them. Vinnies was cheap, the Salvos dear.
Two metres of floral fabric for $6 - who could pass that up?
This was at the Salvos for $2. I find it hard to walk past other people's stitching works in opshops. I know how much work goes into them, so I am compelled to provide a loving home to those that end up dumped :-( Not to mention the fact that I just love Dalmations!
"A" for Australia. I've seen this done many times, but have never had the pattern. Now that I have, it won't be long before it is stitched and framed!

Saturday, July 03, 2010

Some more tea cup pincushions.

I bought three more tea cups last week at Savers, for 50c each. So many people have commented favourably on my first teacup pincushion, I decided to make a few more and give them away as "RAK"s. I started off by giving the first one to my friend LeeAnn, who came to visit us today with her hubby Rob, who has been very ill in the past year but thankfully is now okay. She brought a belated birthday gift for me, with lots of fabrics and nice things, and went home with a teacup pincushion and a dozen fresh eggs!

Thursday, July 01, 2010

Cross stitched card.

I received this beautiful card today, from Sheila in England. We were swap partners in a Stitchin Fingers exchange of cross stitched cards. I posted a pic of mine here a week or so ago.

Monday, June 28, 2010

Somebody else's UFO.

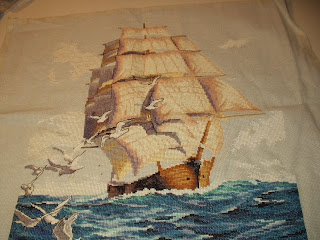
A few months ago, I received a call from our Guild, asking if I would like to take on another commission. It would pay me about $100. I contacted the lady who wanted the job done, and found she lives not far from me, so we met at a local cafe and she showed me her UFO. She has done all the cross stitch (and beautifully worked too), but when it came to the back stitch detail, she said she just lost interest in it! She said she is in no hurry for it - just wants to see it finished one day, so I'm not under any pressure. There is no way I would have done this pattern from scratch - I'd take forever! But I find back stitching quite relaxing, so I figured for $100 I may as well take it on! The photo at the bottom of this post is the work she has done; it looks distorted because of the angle at which I took this photo. The other photo is the picture on the kit packet.

Work in Progress.

This sampler is one of the UFOs I selected to finish this year. It was a Round robin from 2003, and only needed borders and stuff to finish it off. Originally I assumed I would probably frame it, but now that I'm running out of walls to hang things, most of my embroideries will be incorporated into patchwork throws or table runners, and this is one of them. I wanted to use some Aboriginal Art fabric to do the border, but it didn't look right on its own. My good mate Cheryl dropped around tonight to cast her expert eye over my project, and she suggested that I have two borders - a narrow border of one colour against the edge of the sampler, and a wider edge of the Aborig.art fabric on the outside. I liked the concept, but now I can't make up my mind which of the plain colours looks better - the sand colour, or the tan. They both go with the art fabric. (Don't look closely at the sampler itself; I still have a bit of stitching to do to finish it off before I add the borders.)

Friday, June 25, 2010

Making the most of a rainy day.

Today was a wet and cold day in Melbourne, so I decided the best thing to do was stay indoors and play. I read a book, baked a cake:

Tidied up the mess in my craft room, by getting rid of a whole lot of folders relating to my past work, that I won't need any more. Made room for a dozen more craft magazines - yay! Being in a tidying up mood, I got all my small leftover scraps of material out, and cut them up into 2" and 2-1/2" squares (and strips if they were too long and thin for squares.)
Having done that, I went on to make something that I'd seen on Sew Mama Sew's blog here and printed off to do some day. I drew a grid of 2" squares on the back of a sheet of light stabilizer. (I forgot to photograph it before I put the fabrics on it, but you get the idea...even to where I stuffed up and drew a couple of lines in the wrong place!)
Arranged my 2" fabric pieces on the grid until I was satisfied, then ironed them on to it.
Then pressed each section into a fold between the fabrics, and machine stitched along the back of each fold. Finally, trimmed the whole thing square on my cutting mat, and voila! Easy peasy patchwork! Don't know what I'll do with it yet - probably put a border and backing on it, and just use it as a hot dish mat on the kitchen table, or something.

Saturday, June 19, 2010

Ideas and advice, please!

Remember that stunning length of fabric I bought at a Patchwork show last month - the Japanese one with cranes flying across it? No?? Well anyway, I met up with my friend Cheryl today, at a meeting of the quilting group that meets in Diamond Creek, which is halfway between me in Eltham and Cheryl in Hurstbridge. We were guests at this meeting, and were made very welcome by all the ladies, who loved showing us their work.
I had brought my piece of fabric with me to show Cheryl, as she always seems to be able to come up with brilliant ideas on how to do things. When I said I was reluctant to cut it up, she immediately suggested that I make it into a "window", where you see the scene behind the window panes. I knew exactly what she meant, as I love those type of quilts, and when we discussed it with some of the ladies at the meeting, they all agreed it would be the best way to go. Cheryl then said I should cut some strips of paper and lie them across my fabric to see what it would look like before I actually started cutting it into sections. So I bought a large sheet of black card on the way home, measured the fabric, and cut lengths of card to fit. Here is what the various configurations look like: Into four sections with a narrow sashing: Into four sections with a wider sashing: Into six sections: Into nine sections:
I think I like the nine sections best. They would be blocks about 13" square. What do you think?

Friday, June 18, 2010

Teacup Pincushion.

I spend too much time on sorting out my stash, instead of actually doing something. Every time I tear out a pattern from a magazine to file in the appropriate folder, I look through the folder at all of the other things I want to do. When I do decide to make something I have to get the fabrics out of my fabric stash, which means tidying it up first so I can find what I want. (I am an Aries, does that tell you anything?)
Recently I was sorting out some magazine articles, and I rediscovered a little project that I filed away last year sometime. It is for a pincushion in a teacup. You could use an ordinary teacup, but the pattern shows it done in one of those little Demitasse-sized cups. (I have a set of those, but my MIL gave them to me, and even though we don't use them, I didn't want to take one from the set for this project, because they are VERY old!) So I have been looking around opshops for a few weeks, and finally found one. Not quite a Demitasse, but smaller than the average teacup. Not taking into consideration the time searching my stash for the right fabric, it took me all of 15 minutes to put it together! The pattern is by Larissa, and is here on her blog mmmcrafts
Here is mine:

Wednesday, June 16, 2010

Ribbon Netting or Ribbon Weaving.

Pam's guess was about right, albeit a different name. I found this project in one of the books I'd borrowed from our Guild. "Fabric Art Workshop" by Susan Stein is not the sort of book that usually grabs my attention, as I am more of a traditional (old-fashioned) embroiderer. But it has some fun projects that I decided to play with. Following Susan Stein's instructions, here is what I did with my ribbons and two pieces of water soluble stabliser.
Using Zig zag stitch on my machine, I stitched the red and pink ribbons to one piece of stabliser.
Laid the second piece of stabiliser over the bit with the red ribbons, and pinned, then machined the blue ribbons on top of that, in the opposite direction.
This is one side. This is the other. I then soaked the piece in warm water for a few minutes until the stabiliser had dissolved.
Voila! Ribbon Netting! The MOTH who has no artistic tendencies, looked at it and said "What is it?" I explained that it wasn't really ANYthing yet. I would incorporate it in some future project. "Aren't you going to tidy it up? All those uneven edges. I could trim it for you on my paper guillotine if you like?" I said thanks but no thanks...I'll fix it up!

Can you guess what this is?

Or, what it will be? At the moment, there are two bits of fabric with ribbons pinned to them. I meant to finish this project tonight, but got sidetracked with a new book. Come back here tomorrow and see what I've done.

Tuesday, June 15, 2010

Alexandra Quilters Show.

I was going to create a separate blog for this quilt show, but decided it was easier to just add these photos to the existing blog I started for the Waverley Patchworkers show photos, and change the name of the blog to reflect the variety of quilt shows I've been to this year so far. Local Community Quilt shows is where you will find my photos.

Monday, June 14, 2010

Another quilt show and two finished projects.

Ken and I went for a drive into the country yesterday, thinking we would find a nice quiet town and have a leisurely lunch. The nice quiet town of Alexandra (about 120 kls from Melbourne) turned out to be busier than Bourke Street! They were having their annual Truck and Hot Rod Show, but not only that - the local quilters group had their own show as well. We decided to go there first, and spend the rest of the day in the town looking at the cars and trucks, and I've written more about that on another blog. Getting back to the quilt show, it was small but very impressive. I'm about to post all my photos elsewhere, and will add a link here when I've finished.
I finished these two items when we got home after our day out. The elephant on the wind cheater only needed the blanket stitch done, as I had already changed the fabric for the ear from plain fabric to this pink gingham, which is all I had that was anywhere near suitable. Thank you to those who offered suggestions - all were tried, but I ended up going for the easy solution! The grey ribbon bow is to hide the bit of green icon still visible after the applique was done. Again, I tried a few different things, but ended up pinning the bow on to show Ken (who shook his head), but I can't be bothered messing around with it any more, so the bow stays.
The cross stitched card is for a Stitchin Fingers group exchange. It is from one of Donna Kooler's books, stitched on 14ct aida with DMC floss. I added green beads for the eyes instead of the single straight stitch on the pattern. The lace top and bottom is just a filler, because the cat looked a bit lost in all that expanse of cream aida!

Thursday, June 10, 2010

This week's stitching.

Today I visited my Japanese friend and showed her all the Japanese themed goodies I've accumulated over the past month - patchwork fabrics, ornaments, and my first attempts at Sashiko embroidery (for those who don't know, that is a form of traditional Japanese embroidery). She admired everything, and approved of my Sashiko work, saying my stitches were nice and even, as they should be in this style of work. High praise from a native Japanese lady!
This biscornu was on my UFO list. It was meant to be a Christmas gift last year, and I had intended to give it to S. for Christmas this year, but I've changed my mind about that. I have only made two biscornus before this one, and it was a while ago. I'd forgotten how to finish them off properly, so this one is not finished off well enough to present to a good friend as a gift. (That doesn't mean she won't get it at all - just not for Christmas!)
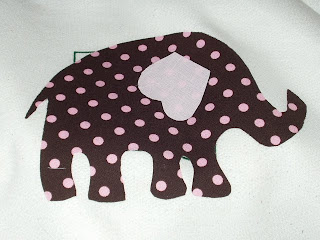
We went to the Zoo this week and finally got to see Mali, the four month old elephant. It inspired me to come home and do this applique on an old windcheater that I was going to throw out because the printed logo has no meaning for me now. Unfortunately a small part of the logo is still visible, but as I have yet to do the blanket stitch around the motifs, I'll just embroider a flower or something extra to hide it. Not sure about that pink ear. Ken said "What's the white thing in the middle?" I said "It's not white, it's pink, and it is her ear". He said "Oh..." doubtfully, and I tend to agree with him. Oh well, after I've done the blanket stitching around it, if it still looks odd, I might use some fabric paint on it. Helpful advice, anyone?

Monday, June 07, 2010

Stitching Retreat in the Yarra Valley!!

I've just discovered Leanne Beasley is planning to host a stitching retreat next Spring, over my side of town - hooray!!!! Who's coming?? Go to Leanne's blog here to read about her plans, and how to register your interest.

Giving myself a break from lists!

Also, a break from my current UFO. I have been wanted to play with my new Sashiko fabric ever since I borrowed the book "Japanese Sashiko Inspirations" from our library. Today was the day. I decided to start with a small easy design, and traced this and another pattern on to my indigo fabric.
The book says if you don't have the actual Sashiko threads, you can substitute cotton perle, crochet cotton, 4 strands of DMC, or similar. I chose to use some perle which I had lying around, as the colours were similar to those in the book illustration. Here is my tracing and my first stitched attempt. I used white dressmakers carbon paper to transfer the tracing on to the fabric, as you can see with the other pattern still to be stitched. I'm not going to use perle cotton again; it was too thick and difficult to pull through the fabric. I have some crochet cotton that I will try next. Next time I go to a Craft Fair, I'll purchase some proper Sashiko thread, as it will look much better. I'd like to do more of this style of embroidery. It is basically only running stitch, and while that sounds easy enough, to do Sashiko properly, the stitches must be very even, and in a certain sequence according to the pattern. If I get the right cotton, maybe my poor hands won't ache as much as they do after an hour of tugging perle cotton through resisting indigo fabric!

Saturday, June 05, 2010

Journals and Lists

I am a List Person. Not only shopping lists, but 'to do' lists in many forms. I make up a menu for each week, and a shopping list to fit. I get frustrated and cross with myself when I have a lot of stuff to do, and can't make up my mind what to do first. Housework is easy - I don't have to do a list for that. Washing, ironing, vac. and dust, wash floors - all those are done when it has to be done, but I'm not paranoid about keeping the house spotless. Just clean enough to be livable, and tidy enough to find things within ten minutes ;-)
But after reading some articles in craft books and magazines about people that (a) keep journals of their works or (b) have a list of projects and work on them in some kind of order, I decided it was time I got my projects organised. Some stitchers have a rotation system, where they work on certain things on a certain day. I can see how they would achieve results, but that's not for me. Some lucky people work on just one project until it is finished, and then start another. No way - I'm not that disciplined. I did a write up here a while ago, on how to prioritise your UFOs, and yesterday I decided to take my own advice! So I've created a page headed "UFOs, WIPs, unworked kits and linens". Under that, I've listed the categories, i.e. tablecloths, doilies, aprons, etc. I should mention here that I have not yet counted how many actual THINGS I have in my stash in each of those categories... The next subheading is "Unfinished cross stitched pictures", which are the projects I am attempting to complete this year. Then I've got "Goals for this year" which are the above mentioned UFOs, plus some projects I want to do for gifts.
I got a bit depressed when I saw all that written down, so I went off on another tack and made up a list of "Finished works - Kept and Given Away". Now that was a surprise - and a shock! This lists only the items I have made in the past 10 years or so, and includes all the small stuff like FPCs, ATCs, and cross stitched greeting cards. I started keeping a record of everything when I got a computer 10 years ago. Whatever went before that is lost in history, apart from what I've kept. I used to do embroidered items as gifts for friends overseas, but never kept a record, and I've forgotten most of them now. Anyway, my totals are 267 items made, of which I have given away 208, and kept 59. Among those are 53 FPCs, 19 ATCs and 64 assorted greeting cards. I had no idea I'd achieved so much!!
My next list will take a bit...no, a LOT - longer. I've accumulated a heap of craft magazines, and bookmarked all the projects I'd like to have a go at one day. I've already made a handwritten list, which I did on the floor, with the magazines spread out around me in stacks. I have 52 magazines, and I've earmarked 135 projects. Oh, I nearly forgot the folders I've got with projects that I've torn out of magazines, or downloaded from the internet. Haven't counted or listed them yet.
I'm starting to think this was NOT a good idea. I could have finished a UFO in the time I've taken to make up all these lists, but all I've done is given myself a little hissy fit. I reassure myself that I am not alone with this problem. Over at Stash Manicure, this quilting Blogger has some great ideas about how to manage your Fabric Stash. I briefly (about 2 seconds) thought about making a list of my fabric stash too, but decided against that, in case I sent myself completely around the bend. But Stash Manicure is a great blog - as much humour as good ideas - have a look if you've not been there before!