"It takes ages to finish a quilt you're not working on!"

Tuesday, August 30, 2011

Today's stitching.

I didn't leave the house today except for a quick trip to the shops to pick up my mail and buy some fruit and vegies. Then it was back to work...or should I say 'play'. I completed the ninth block in Leila's Skill Builder series - this one is called Double Star. As I said before, I'm not really keen on these flying geese patterns, as I have trouble getting all the points where they should be, and today was no different. But it's my third attempt, and I don't feel so uneasy about starting them now, even if they don't end up perfect! Leila showed two examples of the layout and I tried them both before deciding on the second one, and stitching it up.
My other task today was to get all my 2-1/2 inch fabric squares out, sort them into darks and lights, and then sew them into four patch blocks. Jane over at Loopy Lou's Adventures is always finding neat stuff to do on the internet, and I find myself following her down the track of many of her projects! This one is called "Mystery Monday" and is on Chris & Barbara Quilts blog I have seen Mystery Quilts on many blogs, but until now have never wanted to get involved, as I didn't want any more quilting projects! But this one is fun, and a great way to use up scraps in one's stash. I've just had a look at this week's instructions, and we have to cut all those blocks in half diagonally, then resew them together, combining light and dark triangles. What fun!

Sunday, August 28, 2011

Quilt Show at Hurstbridge.

Today, Ken and I went to the annual Wattle Festival at Hurstbridge. I've posted more detail on my other blog, so I won't go into any more descriptions here, except to say that there was a small quilt show there, and I took a few photos. The quilts were made by the Essendon Quilters Group (I don't know why the Hurstbridge Patchworkers were not exhibiting, but it doesn't really matter). I've posted my photos at my Quilt Show blog here if you want to see them.
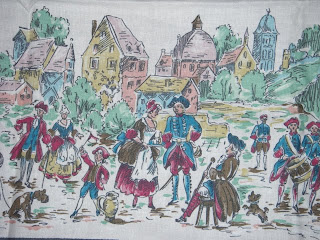
Oh I nearly forgot! While we were at the Festival, we walked pass a house where the owners were having a garage sale, so we wandered in. Among all the other stuff, there were some bundles of fabric, and I found this gorgeous length of cotton for $5! 44" wide and just over 2 yards long. Nice addition to my stash. Even Ken liked it!

Message to my American friends:

I don't know how many of you are on the East coast, but if you are, please stay safe. My thoughts are with you, remembering how worried all Australians were when Cyclone Yasi was approaching our east coast not so long ago.

Friday, August 26, 2011

Today's finishes.

This block was one of the Skill Builder samplers, and when I saw the same block in the same colours in a magazine, made into a little wall hanging, I thought "I can do that!" It was sheer coincidence that I'd chosen these colours for my sample block; I couldn't believe my eyes when I saw the project in a recent "Quick Patchwork" magazine.
This Flying Geese block is the eighth sample block in the Skills Builder series. I'm not really keen on piecing triangles; I can never get the corners to match up properly, but it's all a learning process, and I'm certainly learning a lot from Leila's tutorials.

Thursday, August 25, 2011

The Right Stuff!

I found the right fabric to use for my opshop finds quilt. You'd never guess where I bought it....at the opshop! As soon as I saw it in their remnants box I pounced. For $3.50 I got a 74" (180cm) length of matrial 35" wide - plenty and more to spare for something else. Here it is, and there are a few of my embroideries laid out on it. What do you think of that? The fabric has to be washed and ironed first of course, but I couldn't wait to see if my initial instinct was right.
Dianne over at Beach Textiles also collects linens, but she 'upcycles' (is that the right term?) some of her finds into other objects. This beautiful doiley was included in one of her blog photos, and I commented on it. She said I could have it, as it was too nice to cut up - you bet it was! It arrived in the mail yesterday; I am always gobsmacked at the generosity of our blogging community. Thanks again Dianne!

Tuesday, August 23, 2011

More layouts for opshop finds.

One of my blogger buddies and fellow quilt enthusiasts came over for lunch yesterday. I haven't seen Connie for a while, so it was great to catch up on our news, and share lots of show and tell with our patchwork and quilt projects. I wanted Connie's advice on how I could lay out this opshop finds wall hanging I want to do, and we laid out the embroideries on various pieces of fabric from my stash. A blue background, a blue/green background and a roses 'wallpaper style' background. We agreed the roses didn't work at all, and the blue backgrounds were okay, but neither of us were wildly enthusiastic about any of them. Connie suggested a red background might look good (but not the gingham I had on here on an earlier post), and another blogger suggested to me elsewhere that I should try black and white striped fabric. I think that sounds rather good, so I might lash out and buy a metre of cheap fabric just to see how it looks. In the meantime, I've made two more mug rugs - these are for exchanges. Mine will be coming from New Zealand and country Victoria. Looking forward to adding to my growing collection of these little rugs!
These are the fronts: and here are the backs. Yes I know - one is a bit smaller. Luck of the draw, or should I say of my scrap stash!

Saturday, August 20, 2011

Who changes the needles in their sewing machine?

I'm ashamed to say that I don't. The only time I used to (40 years ago), is when I was making my own clothes from stretch fabric (remember those "Knit-wit" classes and patterns?). We were taught to use the needles with a rounded point so they wouldn't tear the stretch fabric. If I have to alter a hem or seam on a pair of track pants or other stretchy material, I will hunt for my special needle to do the job, but other than that....I haven't changed the needle in my machine for years. I think the last time I did was when it broke! Had no choice that time!
The reason this subject came to mind was when I was reading Mary's blog Molly Flanders, and she posted an item about some new cotton she was using, and the special needle to go with it. I wondered what she would think of me using the same needle for years on everything I sew! I did post a comment to that effect on her blog, but as there were 150 other comments, mine will probably get lost in the crush, lol! She is hosting a giveaway of those new cottons, hence the heap of comments.

Thursday, August 18, 2011

"Mollie Makes"

Craft bloggers all over the world are raving about this new magazine published in England. "Mollie Makes" is quite simply - delicious! Full of projects and ideas, articles and photos of crafty people, their homes and their work, it is unlike any other craft magazine I've seen. The nearest to it in Australia would be "Homespun" which is also dedicated to home made crafts, but the format is quite different. Jane - one of my dear blogger buddies was happy to send me the first two issues in exchange for a couple of Aussie craft mags. They arrived this week, and I have them on our coffee table so I can pick them up and drool every time I sit down for a break :-)

Unusual fabric, and a doiley.

I found these at Janet's Jumble, the Collectables store in Eltham. It is not an opshop, but it is more interesting to fossick around there than it is in Savers! This photo of the doiley is far too dark; I should have taken another shot. The embroidery is in various shades of brown and cream, and is very pretty.
I couldn't resist this piece of fabric; it looks French, or at least Continental. Who knows what I'll use it for? I'll find inspiration one day in one of my magazines or books!

Wednesday, August 17, 2011

Bow tie blocks.

In my stash I have a swatch of curtain fabrics that I picked up somewhere ages ago. I put them through the washing machine last week to see how they would come out, and to my surprise, they didn't shrink or fade at all, despite the label advising to 'dry clean only'! I had a few ideas in my head about what I would do with them, but made a sudden decision tonight to use them as the base for my Bow Tie blocks. I'd pulled out all the ties that had been deconstructed, and had been looking through my stash for a suitable background fabric. This curtain fabric is ideal - the swatches are solid colours, but with a design woven through the fabric, and the sheen on the fabric complements the sheen on my ties. Here is what I did tonight: I got some more ties out to match up with the swatches - won't they look great! And there are masses of ties still to sort out and deconstruct...

Tuesday, August 16, 2011

Two patchwork blocks.

I'm improving my skills! It took me about an hour to complete this "Virginia Star" block - the seventh block in the Skills Builder Sampler lessons. I had an hour to spare after I finished the above block, so I decided to make another Sunbonnet Sue block. I'd had the elements traced on to the fusible web paper for ages, so all I had to do was find some fabric scraps and fuse them to the pattern bits, then iron them onto the background. I've decided what I'm going to do with these blocks; I saw a Sunbonnet Sue Sampler quilt in a book, where the Sue blocks are alternating with the sample blocks that I'm doing with Leila's tutorials. Coincidentally, pink is the main colour throughout all my blocks, so I thought I may as well join them all up in the end! The ric rac is only pinned to the hat - I haven't started the hand stitching yet. I've drawn the cat's face in permanent fabric pen, as I'm too lazy to stitch such tiny bits. I've also drawn a line around the cat so it shows up in this photo, although I will be stitching around it along with the rest of the applique at a later stage.

Monday, August 15, 2011

"Abandoned at the Op Shop" project.

This photo is of some of the unframed cross stitch and embroidered items I've collected at opshops. I have just finished sewing a black border around each one, and now I want incorporate them into a quilt/wall hanging. I can't make up my mind what kind of fabric to use as the background - plain or patterned? In this picture they are lying on the piece of gingham I bought recently. I don't want the background fabric to detract from the individual pieces, but a plain colour might be too simple. Any ideas?

Saturday, August 13, 2011

Two lovely doilies.

Discovered these beauties this morning at the Vinnies Opshop in Briar Hill. This one was $3.00. And this was only $2.50!

Friday, August 12, 2011

Opshop finds.

I found these little gems at the Brotherhood opshop in Eltham today. A lovely big piece of red gingham for $4 - I can always use gingham in my patchwork projects!
A cute little pincushion worked in petit point - 50 cents
And a nicely worked doiley for $1 to add to the hundreds in my collection...

Tuesday, August 09, 2011

Mug Rug

My Tea Party swap partner loves Peacocks, so it was easy for me as another Peacock adorer, to make a mug rug for her, as I already have a nice stash of peacock fabrics!

Friday, August 05, 2011

Friday is Play Day at my house!

I've had a busy week, running around most days, so I decided to stay at home today, instead of going out with friends or opshopping (saved money too!). I borrowed a couple of books on quilting from our Guild when I was there on Tuesday, and have been looking through them. One of the projects was completely different from anything I'd ever seen on a quilt, so I made a sample block for my collection of blocks. It is called "Sword Dance". The book is called "Quick Quilts To Make In A Weekend", edited by Rosemary Wilkinson. There are five contributors whose designs are featured, and it doesn't say who made up this one, but I love it! It required four pieces of tartan/plaid fabrics which I just happened to have in my stash, and a background of calico, of which I have heaps. The picture of the completed quilt in the book looks great! One day I might make a mini quilt or wall hanging using this pattern.
The next thing I did was applique a tea towel with a teapot, for an exchange I'm in this month. It is called a Tea Party exchange, and we swap a number of items with our partner, including a hand made teatowel or teacosy (I opted for the easy one), two Tea Party themed items (mine are pretty paper napkins and a mug rug), a tea party recipe, and a sweet treat. My partner loves dark chocolate, so I'm going to send her a pack of dark chocolate Tim Tams - YUM! The swap organiser wanted everyone to use one of two templates she provided, and I chose the teapot. I transferred the shape on to green gingham, zigzag stitched around the edges, appliqued the heart onto the centre, cut the teapot out and fused it on to the teatowel. Then I added a bit of green ricrac at the top, and fused half of an old doiley underneath, with a length of lace to finish it off.
Now all I have to make is the mug rug, and I've already started that, so it will be the next post on my blog in the next few days.

Thursday, August 04, 2011

Batting tape review.

Tonight I finally got around to doing a test run on the batting tape I bought at the Quilt & Craft Fair last week. For those of you who want to know what to look for, this is the packet it comes in. And this is what the tape looks like - very thin, with a rough side that is the side you iron on to your batting pieces. A bit like fusible interfacing really. I had this long strip which wasn't going to be good for much until I cut it in half.. and joined the two long bits to make a small oblong. Just right for a mug rug! Aha! Just found another useless long bit, which I shall now join to the first two, to make a slightly bigger piece. I think I'm going to like this stuff!
Joy suggested joining bits of batting by joining them together with zig zag stitch. I tried that, and it was a bit lumpy. The batting tape is so thin that it doesn't make any difference to the thickness of the batting, unless you overlap the bits of batting that you are joining. There is one aspect of the tape that isn't mentioned in the brief instructions, but I thought of it because I made this mistake once before. I used an applique mat underneath the pieces I was joining, and a piece of Gladbake on top. Some batting can melt with the heat of an iron, especially when it is held down for 10 seconds to fuse the tape. I used several types of batting, and none of it melted while I used the applique mat and paper on top, but I wouldn't like to hold my iron on top of it without that protection.

Wednesday, August 03, 2011

Skill Builder Sampler block No.6

This design (called Bow Ties for obvious reasons) is something I have been wanting to do for ages, and although I've got instructions in piles of books and magazines, it wasn't until now that I was motivated to do it - thanks to dear Leila in the USA and her Skill Sampler tutorials. She posts heaps of photos, and clear concise instructions, and she is happy to reply to emails if you have a problem. So! Here is my Bow Tie block - done in about two hours. Up to now I've been using pink and brown matching fabrics that I had in my stash, but I've run out of them, so this block is completely different. They are all cotton except the orange which is satin - hard to sew with, but provides a bit of a shock difference to this block!
And now that I have learnt how to do this pattern, I am itching to pull my collection of neckties out of the stash cupboard and make a wallhanging/quilt from them! That will be an explosion of colours, and I have a problem to solve before I start - what should I use for the background? Black? White? (The background is the lime green in my block here)
By the way, I haven't forgotten about the five people who asked for more information about the batting tape. I'll write more about that tomorrow.

Skills Builder Sampler Block No.5

This was supposed to be completed a week ago, but I had a few hiccups with this design! It's not that easy to align all those triangles and I had to unpick quite a few rows before I was satisfied with the block. It still isn't perfect but I don't worry about perfection. I'm more concerned with getting the technique right so if I do it again, I won't make the same mistakes. The lesson learned from this block is to make sure those quarter inch seams are actually a quarter inch!