I have read a lot of books on making journals, both paper and textile. I've even bought a book or two on the subject, but until now I've not done much from them - a couple of small projects, but not a journal. Like most craft lovers, I've got bits and pieces that are experiments with fabric and paper that I've seen in books and online, and thought "I must try that!" So I tried, maybe liked the result, maybe not, but either way, it ends up in a container of some kind with all the other experiments - not good enough to do anything with, but too good to discard, because 'you might do it again one day'.
A few months ago I was reading Mary Mac's blog, and she mentioned a project she was intending to do, something called "Travellers' Blanket". When I read about this, I thought it was a kind of rug or blanket with individual textile pieces fastened to it. That was not really correct, but it got me thinking about my fabric experiments, and what I could do with them. Then at the Quilt Convention this year, one of our Guild members showed me something she had made, and there it was - perfect solution for my bits! I feel such a fool because I can't remember this lady's name, and she is quite well known in the Guild for her innovative sewing style. She had made up a large book from calico, and sewn various experimental pieces on each page.
So when I was looking for something completely unrelated to the above, I discovered my little learning projects in a basket of stuff, and decided that I had to do something with them TODAY, otherwise they'd get lost in the depths of my stash again. I have a huge stash of calico and a tin full of bias binding, and lots of buttons, so I got everything out on to my work table....
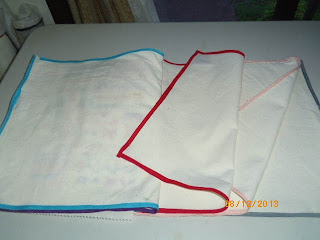
Cut the calico into 12" x 24" pieces, used the bias binding to neaten the edges of each piece, and made this journal by laying the pieces on top of each other and machining a line of stitching down the centre to make this:
Above: The front is a layered collage of patchwork fabric, laces, ric rac, buttons, etc.
Above: On the top left is a trial 'reverse applique'. I had never heard of it before I saw it described in a book, and wanted to try it. The green piece is Aida with stitching in ribbon and thread, with sequins. This was a challenge project in an online forum many years ago. The item below these was in a library book and had to be done before the book was due back, otherwise I would forget it. It involved laying ribbons out in a grid on top of a sheet of water soluble foundation, machining them to same, then soaking the whole piece in water until the backing dissolved. I loved this idea!
On the right hand side is a completed cross stitch piece. I saw this in a magazine and was inspired to make it because I love playing with colours, and this design is simply layers of coloured thread blended and matched in layers of cross stitch on Aida to make this gorgeous pattern. It isn't something you would frame and hang on a wall, so what else do you do with such a thing? Experiments journal!
Above: These pages are little patchwork samples that I made to see how they would look in a bigger project. The one on the left is a 'brick wall' pattern, and the right hand side is my first attempt at joining triangles together to make a block. I had a lot to learn before I got that technique right!
Above: this is calico with fabric paint applied by various means. The piece on the right has a stitchery of a mermaid started but I doubt if it will ever be finished. Just another experiment.
Above: These stitches in perle cotton on homespun were done in a series of workshops at the Embroiderers Guild. Most of the other students were much neater and ended up displaying their work in nice books, but my learning attempts are always messy.
Above: This was slightly less messy. Sharon Boggon's TAST lessons on her blog were great fun to follow and I learnt a great deal, working on Aida with mostly stranded cotton, but using other items such as ribbon or cord as required.
Above: Another project seen in a book borrowed from the library, which had to be done before the book was due back. Pieces of fabric sewn together at random over a length of calico, then ribbon, lace, ric rac, or any other trim is machined all the way across the whole thing. You can then make something out of it, or decorate a tote bag, whatever. As you can see, I didn't use mine for anything, but I liked doing it and keeping a sample to remind me of the technique.
Above: There are more blank 'pages' waiting for my future experiments!
6 years ago


9 comments:
Cool way to show a history of all your experiments. And you even left room for future endeavors!
I love it! This is great.
Very cool! I love the idea of a ready-to-use journal waiting to capture your experiments. I can't seem to plan ahead like that!
Such a clever idea.
What a great idea, and I love the different coloured binding on each page
Your fabric journal looks so interesting. I am also working on this idea, and have been trying to work out how to put the pages together. the bindings look like a good idea. I would be interested to see how your have sewn the pages together.
Oh I could sit and look at this all day! I think it is a wondeful idea!
Looks like you are having even more inventiveness as you go along - good on you... Take care x
What an inspiring idea. I have so may of those bits and bobs and they would look good if I ever organized them.
Post a Comment